
This blog is about getting started on the ESP32 module with the Arduino. We will learn how to set up an ESP32 cam for video streaming and face detection with the help of Arduino IDE. With this, we will also learn the specification and overall hardware of the ESP32 cam board.
Introduction to ESP32
As you can see in the image, ESP32 is a small camera module. You will get this module at a very cheap price on ROBU. It comes with an OV2640 camera and several GPIO pins that are used to connect to the peripherals. The good thing about this module is that it comes with an SD card adapter to save the data like images taken by the camera module and stream it over the internet.
We will see some of the important features of the ESP32 camera.
Features of the ESP32 camera module

- Ultra-small 802.11b/g/n Wi-Fi + BT/BLE SoC module
- Low-power dual-core 32-bit CPU for application processors
- Up to 240MHz, up to 600 DMIPS
- Built-in 520 KB SRAM, external 4M PSRAM
- Comes with the interfaces such as UART/SPI/I2C/PWM/ADC/DAC
- Support OV2640 and OV7670 cameras with built-in flash
- Can upload images over Wi-Fi
- Comes with a TF card
- Support multiple sleep modes
- Compatible STA/AP/STA+AP working mode
- Support for local serial upgrade and remote firmware upgrade (FOTA)
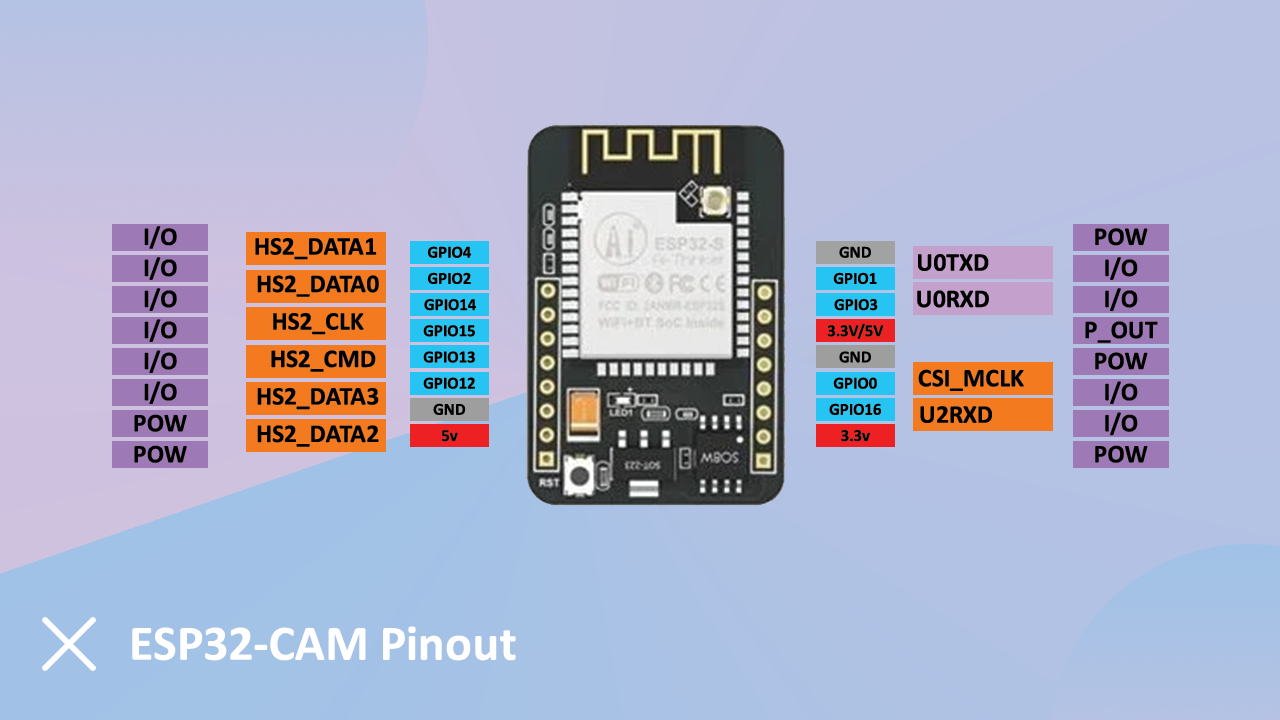
ESP32 Cam Pinout
The following image will show the pinout image of the ESP32 cam module.
Hardware Requirement:
- ESP32 cam module
- FTDI converter module
- Jumper wires
Installing ESP32 in the Arduino IDE
For the installation of ESP32, you need to follow some basic steps.
- The most basic is to download Arduino IDE.
- After complete installation, open the Preference tab of Arduino IDE by clicking on the file/preferences. (You can also use shortcut Ctrl+Comma).
- And paste the following URL in Additional Board Manager URLs:
https://dl.espressif.com/dl/package_esp32_index.json, http://arduino.esp8266.com/stable/package_esp8266com_index.json
- Go to Tools/Board manager.
- Search ESP32 in search bar boards manager.
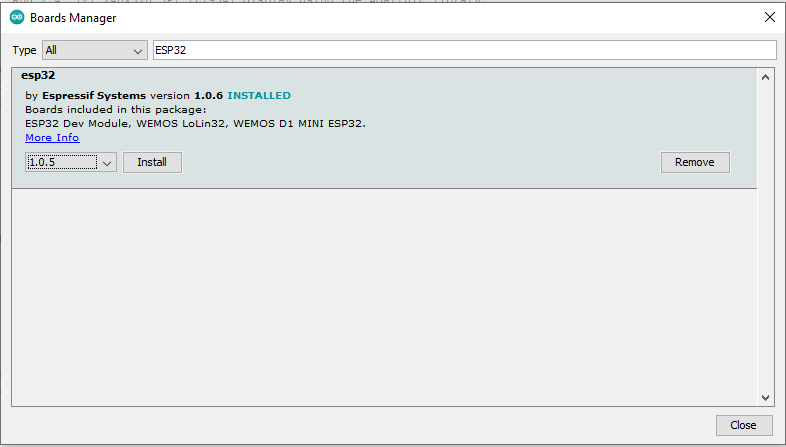
- Here you will find an ESP32 related board, select the latest version and hit the install button.
- Now your board gets successfully installed.
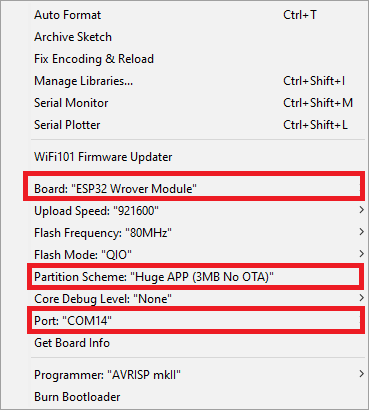
- After installing the ESP32 board, go to Tools/Boards/ESP32 wrover module.
- Go to Tools/ Port and select the COM port to which the ESP32 cam is connected.
- In Tools/Partition Scheme, select “Huge APP (3MB No OTA).”
Circuit Diagram
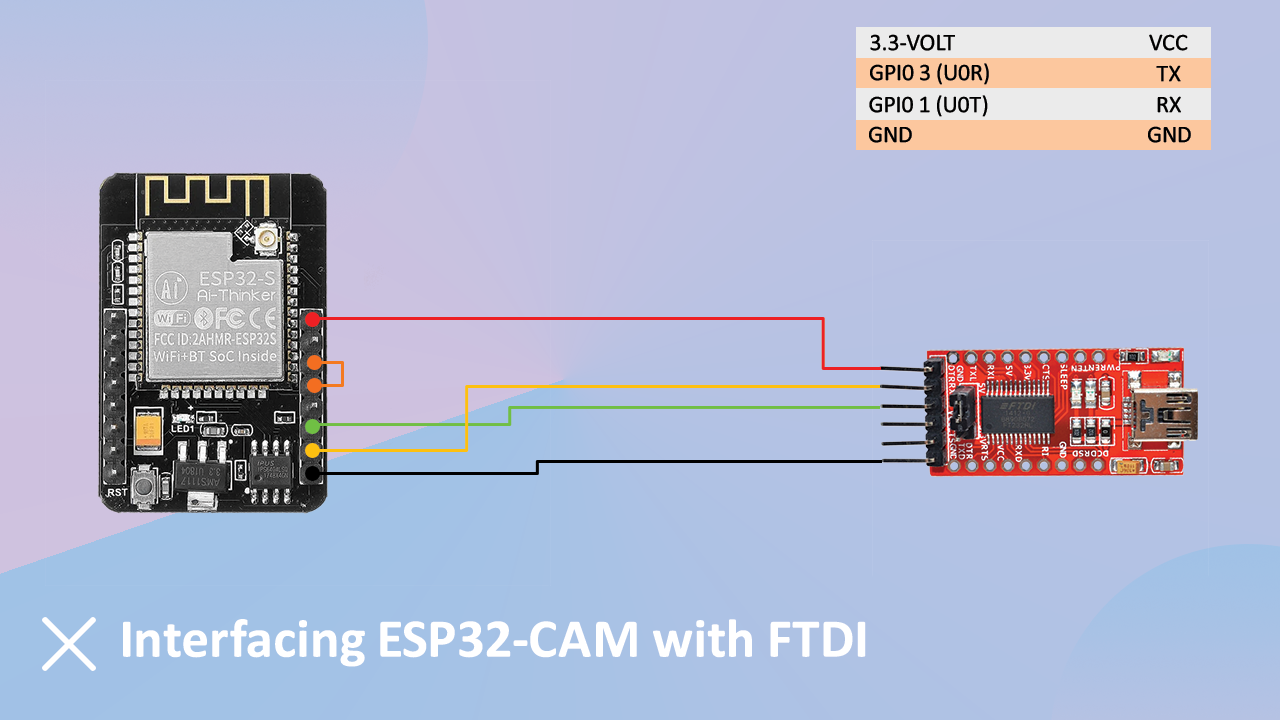
Connections
| ESP32 cam | FTDI converter |
|---|---|
| UDR | Tx |
| UTD | Rx |
| 3.3V | VCC |
| GND | GND |
While doing this connection, you have to short the pins between UO1 and UO0.
Coding part
For coding the ESP-32 cam module, you will need to do the following task:
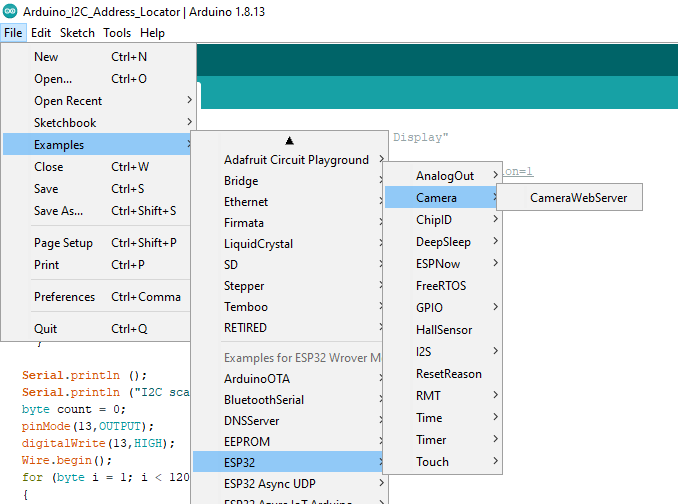
- First, go to the board and select the ESP32 board. In that, select the ESP32 WROVER module.
- Now open file, ESP32 and camera code, The path will be like:
- Now, mark the following line as a comment.
#define CAMERA_MODEL_WROVER_KIT // Has PSRAM#define CAMERA_MODEL_AI_THINKER // Has PSRAM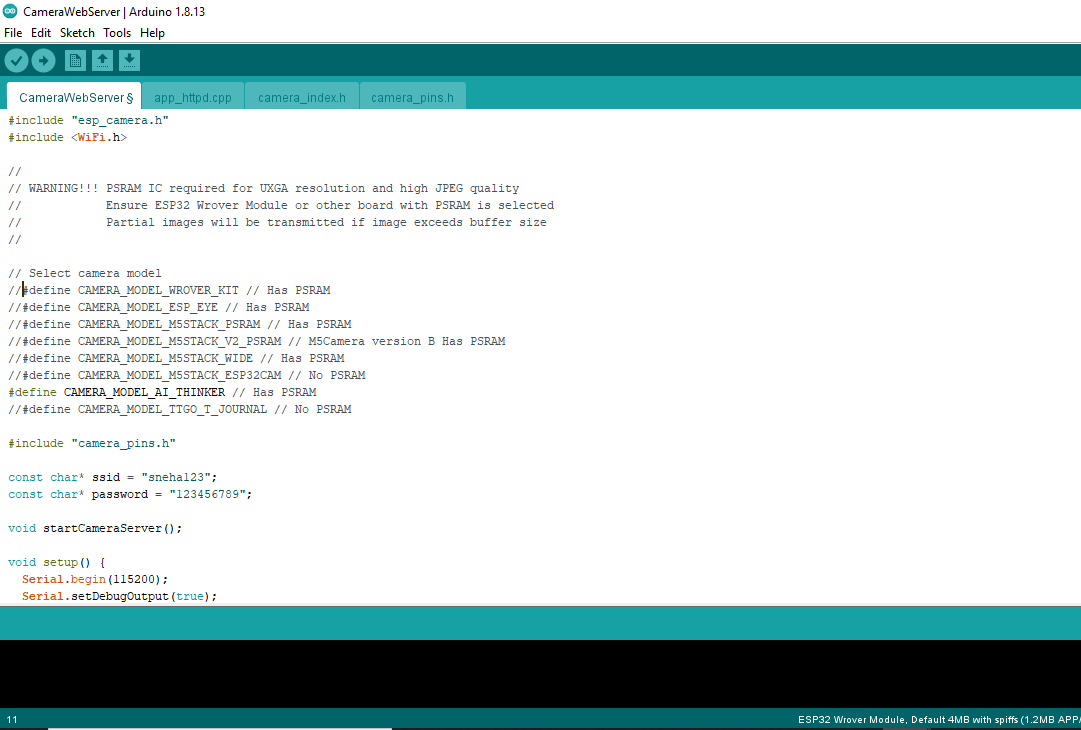
- After making these changes in code, your code is ready to upload to the board.
- Before uploading the code, make the board configuration shown in the below image.
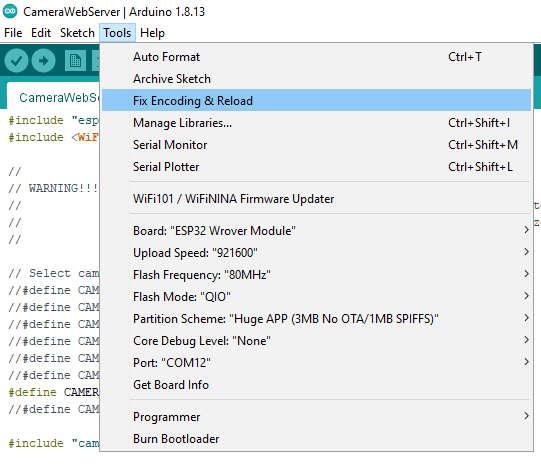
- Select partition scheme as a “Huge APP (3 MB No OTA/1MB SPIFFS)”, and other settings are shown in the image.
- Select the port connected to the FTDI module and done. Your ESP32 cam is ready to use.
- Make sure that while uploading the code, make sure that IO0 and GND is shorted.
- Now hit the upload button. After successfully uploading the code, remove the connections between the pins IO0 and GND.
- Press the refresh button once, and you can see the URL on the serial monitor.
- Copy the same url and open it in the browser. You can see the footage captured by the ESP32 camera.
How to access the Video Streaming Server
After uploading the code in ESP32, you can remove the jumper between IO0 ad GND pins. Press the refresh button once and see the data in the serial monitor of Arduino IDE.
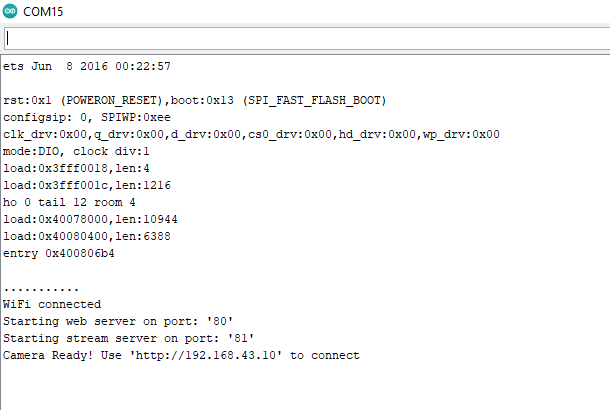
It will show you data for connecting it with Wi-Fi, copy the streaming server address and paste it into your browser URL box.
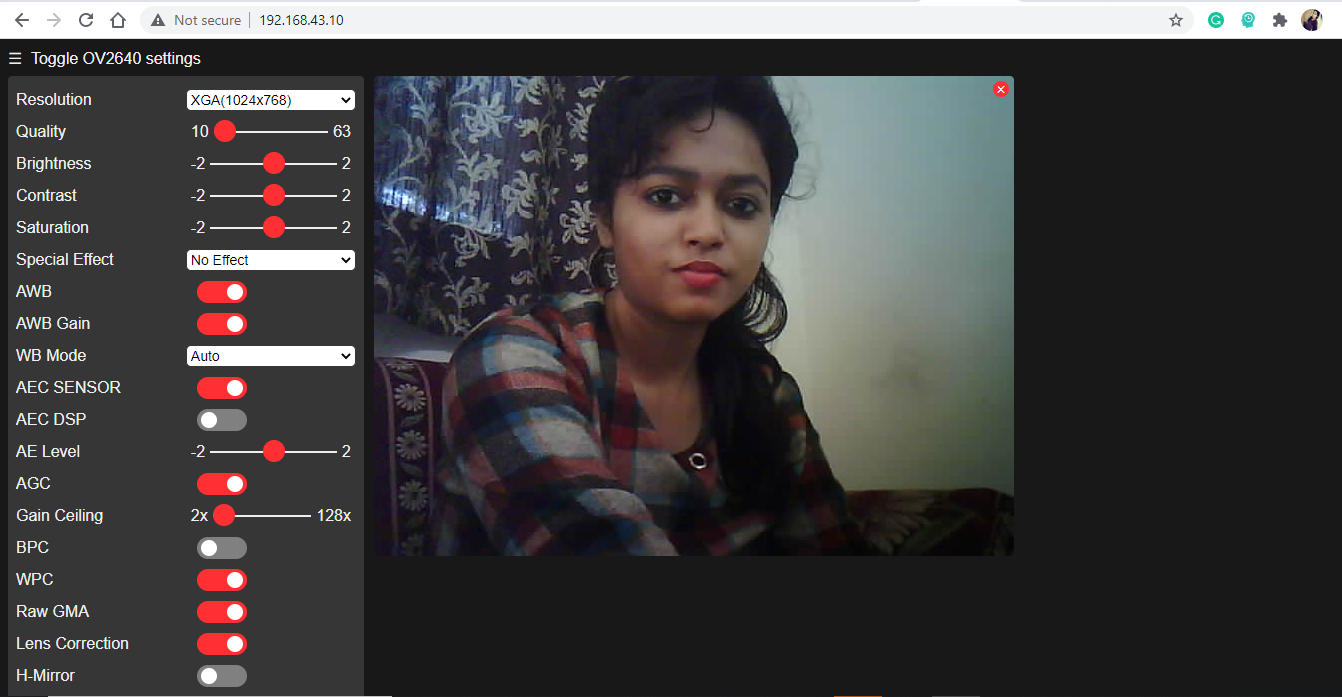
You can see, ESP32 cam is streaming the footage captured by the camera on a web server. You can also take a picture if with the help of the ‘get still’ option. For that, you need to insert an SD card into the device.
ESP32 can also allow detecting a face. All you have to try multiple attempts of enrolling your face with a different angle.
Once it is enrolled, it will detect you and someone not enrolled in its database when you come in front of the camera. It will give you an intruder alert.
We are done here. Now you can your video streaming web server up and running with face detection and recognition with ESP32 board and a few lines of code.
If you face any difficulties…….
If you face any difficulties, you can refer to the link for all kinds of issues while handling the ESP32 board. You can post your query on the ESP32 camera forum of GITHUB.
Over the internet, I also find one site, which will help you with the detailed troubleshooting for ESP32cam. You can check their page from here.
Final Words
While talking about video streaming, taking images, face recognition, ESP32 is a very cost-efficient device to do this task. It can use not only for the hobbyist but also for industrial purpose. This tutorial taught us to operate the ESP32 cam module for streaming video, taking photos and face recognition.
I hope you’ve found this tutorial useful. If you have any doubt, please add your doubt in the comment section.