
The Arduino edge is a board that has become the next best addition to the Arduino pro series for IoT development. This board as the official Arduino site claims “Controls and monitors outdoor environments from everywhere while leveraging AI on the edge”. The Arduino edge is a board that is designed and intended to be used for smart agriculture. But why is the board so expensive and what specific features does the board have?.

“The Arduino Edge Control board is designed to address the needs of precision farming. It provides a low power control system, suitable for irrigation with modular connectivity. The board is compatible with MKR Boards 2G/3G/CatM1/NBIoT, LoRa, Sigfox, and WiFi/BT connectivity.”
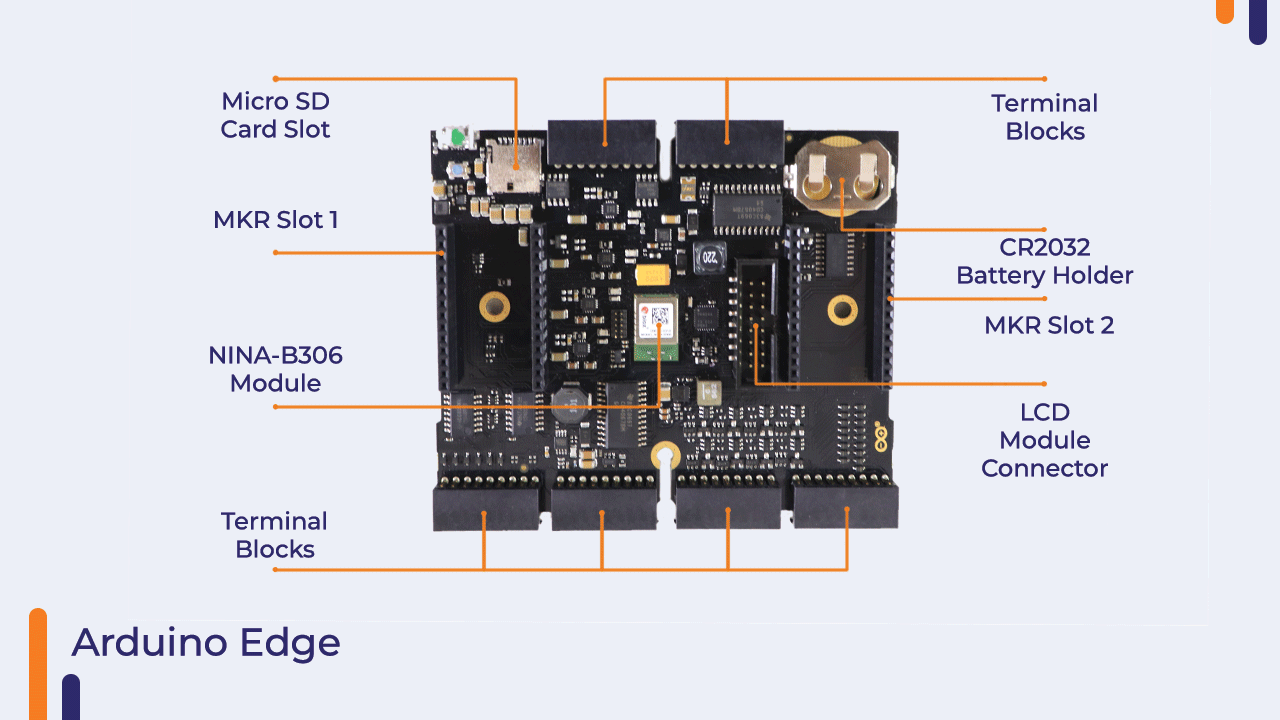
The Edge Control features a powerful processor, the nRF52840 from Nordic Semiconductors, a 32-bit ARM® Cortex™-M4 CPU running at 64 MHz.The onboard MKR slots 1 & 2 can be used to connect Arduino MKR boards to extend the capabilities such as connectivity through LoRa, Wi-Fi, 2G/3G/CatM1/NBIoT, and Sigfox. The board includes 1MB of onboard flash and 2MB of additional QSPI flash, six edge-sensitive digital input pins with interrupt wake-ups, eight latching relay command outputs with drivers and an additional eight without drivers, four 4-20mA analog inputs, eight 0-5V analog inputs, and 16 inputs dedicated to hydrostatic watermark sensors. An additional four relays are included, galvanically isolated and supporting 60V/2.5A devices. A MicroSD slot is provided for storage, and a connector allows for the addition of an LCD panel.
Power is provided through a 12V input, ready for connection to a battery system with solar charging; when paired with a 5Ah battery, Arduino claims the board’s low 200uA sleep current gives the system a 34-month operational lifespan between charges. The Arduino Edge Control also includes an Arm CryptoCell CC310 security subsystem, and a security coprocessor with 128-bit AES/ECB/CCM/AAR acceleration. As you might expect from an outdoor-rated device, the system offers a wide operational temperature range from -40 to +85°C (around -40 to 185°F).
Arduino has claimed that in its datasheet that this board can be used for Automated Greenhouses, Hydroponics/Aquaponics, and Mushroom Cultivation.
How to program Arduino Edge?
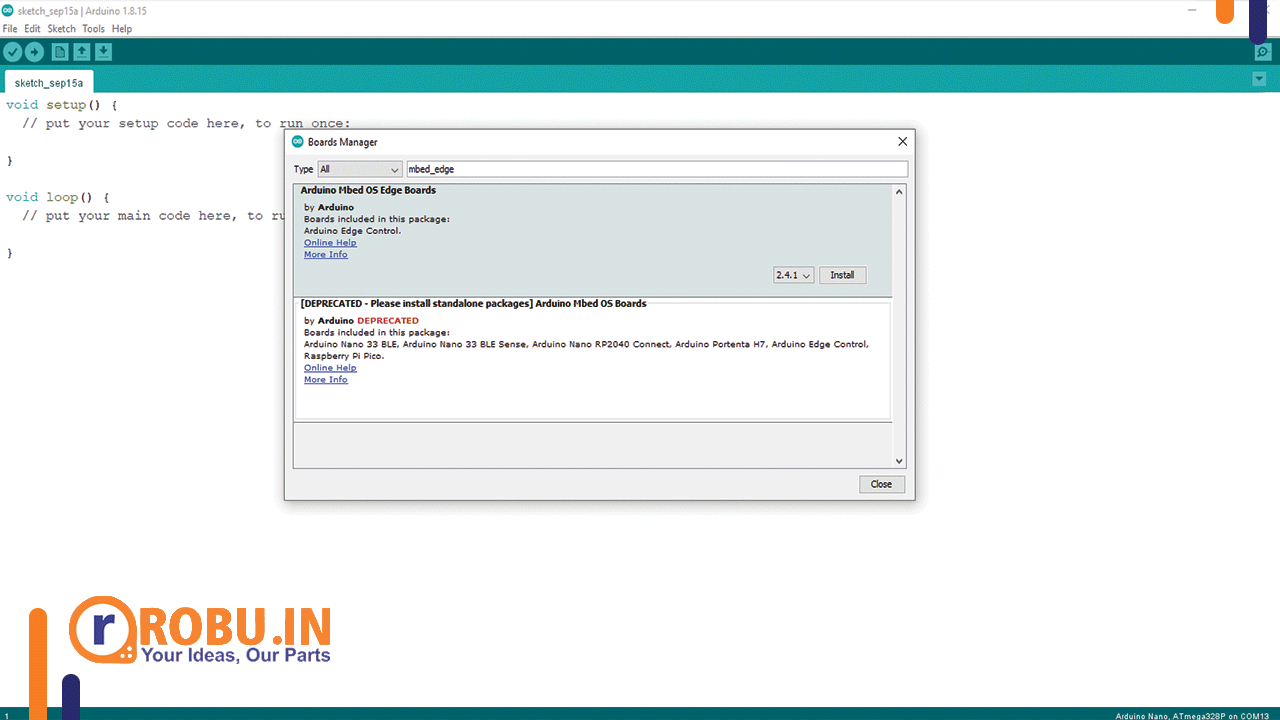
Step 1: Download the embed core from the Arduino board manager. In the Arduino IDE, go to the board manager and search for Arduino edge control.
Step 2: Writing the “Hello World program”.
Copy-paste and upload the below program to the board while connecting to it through USB.
#include <Arduino_EdgeControl.h>
// Set the timeout
void setup() {
   Serial.begin(9600);
}

void loop() {
    auto startNow = millis() + 2500;
    while (!Serial && millis() < startNow);
               Serial.println("Hello, Edge Control!");
               delay(500);

}
If you see “Hello world” printed on the serial monitor. Congratulations! You’ve completed this Step successfully.
Step 3: Led blinking program
The Arduino edge is a very low power consumption device and for that reason, some electronics are kept powered “off” by default meaning you cannot blink Led with the power received from the USB.We have to give it an external 12 V power supply like a 12 V Acid/lead SLA Battery Supply as specified in the datasheet.
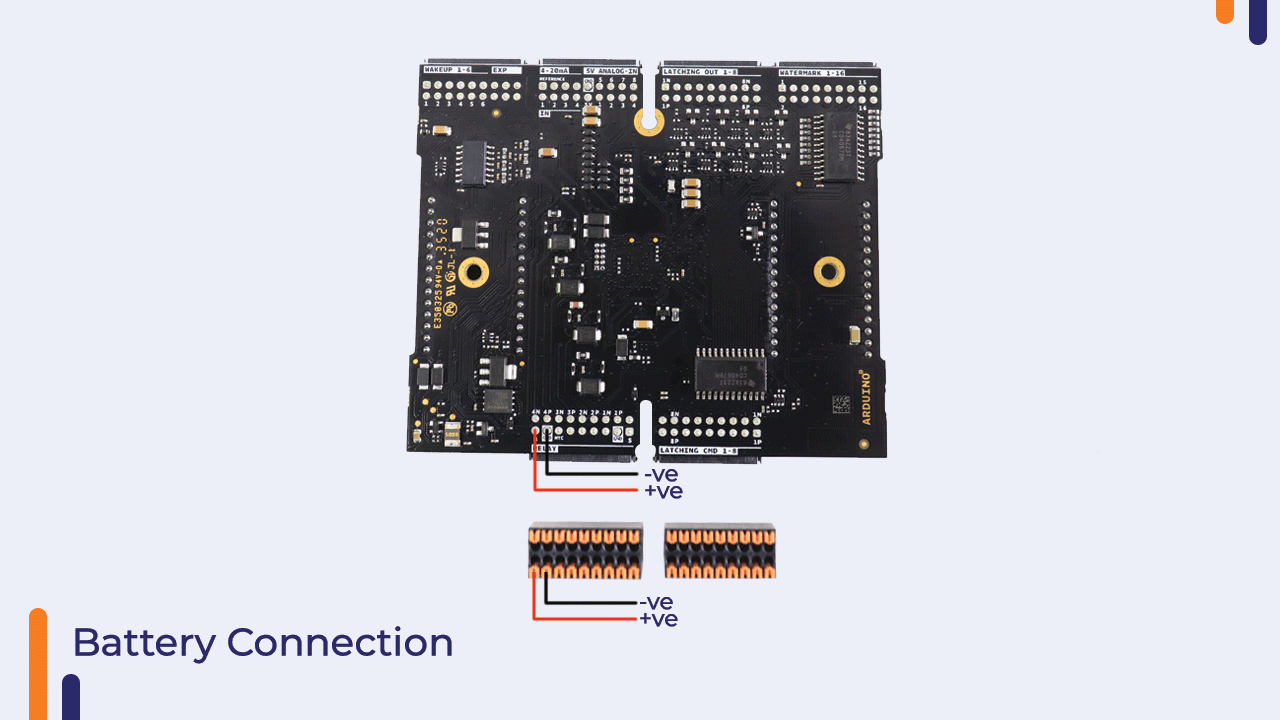
Upload the below program in the board and you should see your LED blink.
#include <Arduino_EdgeControl.h>

void setup() {
  Serial.begin(9600);
  Power.enable3V3();
  Power.enable5V();

  // Start the I2C connection
  Wire.begin();

  // Initalise the expander pins
  Expander.begin();
  Expander.pinMode(EXP_LED1, OUTPUT);
}

void loop() {
   Serial.println("Blink");
   Expander.digitalWrite(EXP_LED1, LOW);
   delay(500);
   Expander.digitalWrite(EXP_LED1, HIGH);
   delay(500);
}
You can learn more about the board on our youtube video.
Thank you for reading the complete blog.
More details on the Arduino Edge Control can be found on the Arduino Store product page